That steep hill in your backyard doesn’t have to be a wasted space or a landscaping headache. With the right structure, it can become the most beautiful and functional feature of your property. By creating level tiers, a retaining wall can turn an unusable incline into a series of garden beds, a flat lawn for kids to play on, or a stunning multi-level patio. This project is about more than just holding back dirt; it’s about reclaiming your yard. This comprehensive guide will show you how to build a retaining wall on a slope, giving you the knowledge to plan, design, and construct a feature that adds lasting value and beauty.
Florida’s #1 Rated Roofing Contractor
Ready for a Roof That Lasts 50 Years?
Get a 100% free, no-obligation roof inspection from South Florida’s only TAMKO Diamond Contractor. No pressure. No hidden fees. Just honest answers.
⭐ 4.8 Google Rating · 600+ Roofs Completed · A+ BBB Rated · Licensed & Insured
Key Takeaways
- A Strong Wall Starts with a Smart Plan: Your wall’s success depends entirely on the prep work. Before you start, assess your slope and soil, confirm local permit requirements, and design a structure with a proper foundation and reinforcement to prevent future bowing or cracking.
- Install a Drainage System to Prevent Collapse: Water pressure is the number one enemy of a retaining wall. An effective drainage system, using a perforated pipe and gravel backfill, is the most critical step to relieve this pressure and ensure your wall remains standing for years.
- Build a Level Foundation and Know Your Limits: The entire structure relies on a perfectly level and compacted gravel base, so take your time on this step. For any wall over four feet high, on a steep slope, or supporting a structure, hiring a professional is the safest choice to guarantee a secure result.
Why Build a Retaining Wall on a Slope?
If your property has a noticeable slope, you might see it as a landscaping challenge. But with the right approach, that incline can become a stunning feature. A retaining wall is a powerful tool that does more than just hold back soil. It’s a structural solution that protects your property from erosion, manages water flow, and gives you more functional outdoor space to enjoy. By strategically leveling parts of your yard, a retaining wall adds value, safety, and beauty to your home.
Stop Soil Erosion
A major issue with any sloped terrain is soil erosion. Gravity, wind, and especially heavy Florida rains can wash away your topsoil, destabilizing the landscape and threatening your home’s foundation. Retaining walls are engineered to solve this problem. They act as a barrier, intercepting the downward movement of soil and holding it securely in place. This stabilization is crucial for preserving your landscape and protecting vulnerable areas from long-term damage. A well-built wall keeps your soil where it belongs, ensuring your yard remains healthy and intact.
Manage Water Runoff
Uncontrolled water runoff can cause serious problems on a sloped property, from creating soggy patches in your yard to pooling around your foundation. A retaining wall can be a smart, lasting solution to help with water runoff. When designed with proper drainage, a retaining wall redirects water in a controlled manner, guiding it away from your home and other critical structures. This prevents water from oversaturating the soil behind the wall, which is key to maintaining its strength and preventing foundation issues, basement leaks, and drowned gardens.
Create Usable Yard Space
One of the most exciting benefits of a retaining wall is its ability to reclaim your yard. A steep slope makes it difficult to do much of anything, whether it’s setting up a patio, planting a garden, or creating a safe play area. By building a retaining wall, you can terrace the slope to create level tiers. This approach effectively transforms your sloped yard into usable, attractive outdoor space. Suddenly, you have a flat area perfect for an outdoor dining set, raised garden beds, or a level patch of lawn for family activities.
How to Plan Your Retaining Wall Project
A successful retaining wall starts long before you dig the first trench. Proper planning is the most important part of the project, ensuring your wall is stable, effective, and built to last. Taking the time to map out your strategy will save you from headaches and costly mistakes. This phase is all about creating the blueprint for a structure that will protect and enhance your property.
Assess Your Site and Soil
First, get to know your landscape. Retaining walls are engineered structures designed to hold back soil on sloped ground, so understanding your specific site is key. Take a close look at the slope’s steepness and the type of soil you have. In Florida, we often deal with sandy soil, which drains well but can be less stable. You’ll also want to identify potential issues like underground utility lines or large tree roots. Before you dig, it’s a smart and safe move to call 811 to have public utilities marked on your property for free. This simple step can prevent a major accident.
Check Local Building Codes and Permits
Before buying materials, you need to understand the local rules. Building codes for retaining walls can vary between Palm Beach, Martin, and Broward counties. Most regulations require a permit for walls over a certain height, typically four feet. Taller walls often require plans from a licensed engineer to ensure the design is safe. Consulting with a professional ensures your retaining wall is designed to meet local building codes and regulations. Don’t skip this step; building without a permit can lead to fines and an order to tear down your hard work. A quick call to your local building department will give you clear guidance.
Measure the Slope and Position the Wall
With a good understanding of your site and local rules, you can start mapping out the wall’s location. Building a retaining wall on a slope can seem like a big task, but with the right approach, you can create a stable structure that prevents soil erosion and transforms your yard into a more usable space. To measure the slope, drive a stake at the top and another at the bottom. Tie a level string between them and measure the vertical drop and horizontal distance. This helps you calculate the needed wall height. Use stakes and string to outline the wall’s exact position to visualize the final result and plan your excavation.
What Are the Best Materials for a Slope Retaining Wall?
Choosing the right material for your retaining wall is a big decision that impacts its look, longevity, and budget. Your choice will depend on the style you’re going for, the height of the wall, and how much maintenance you’re willing to do. Let’s walk through the most common options to help you find the perfect fit for your yard.
Concrete and Interlocking Blocks
If you’re looking for a straightforward, durable, and budget-friendly option, concrete and interlocking blocks are an excellent choice. These blocks are engineered to fit together securely, which makes them a popular pick for DIY projects. They come in a wide variety of colors, textures, and sizes, allowing you to create anything from a simple, functional wall to a more decorative landscape feature. The core components for a strong wall include the blocks themselves, along with a crushed stone base for the footing and backfill, which ensures proper drainage and stability for years to come.
Natural and Engineered Stone
For a timeless, high-end look, nothing beats natural stone. Materials like fieldstone, limestone, or granite create a wall that blends beautifully with the natural landscape. While it can be more expensive and challenging to install due to irregular shapes, the result is a unique and incredibly durable structure. A great alternative is engineered stone, which offers the appearance of natural stone with the uniformity and easier installation of manufactured blocks. Both options are fantastic for managing soil movement, as a well-built stone wall provides a reliable defense against erosion on sloped terrain.
Timber and Steel
Timber retaining walls, typically built with pressure-treated wood, offer a warm, rustic aesthetic at a lower cost. They are a great option for smaller, decorative garden walls. However, it’s important to remember that wood has a shorter lifespan than stone or concrete, especially in Florida’s humid climate, and will eventually need to be replaced. For a more modern and industrial feel, steel is a sleek and long-lasting choice. Materials like Corten or galvanized steel are extremely strong and can be used to create clean lines and interesting designs. Choosing the right materials is key to ensuring your wall is both safe and durable, so weigh the pros and cons of each carefully.
How to Design a Wall for Maximum Stability
A retaining wall is constantly fighting a battle against gravity and the pressure of the earth behind it. A successful design isn’t just about looking good; it’s about creating a structure that can safely and effectively hold back tons of soil for decades. This is where careful planning makes all the difference. Getting the height, thickness, foundation, and reinforcement right from the start will prevent bowing, cracking, or a complete collapse down the road. Think of this as the engineering phase of your project, where a little math and foresight save you a lot of future headaches.
Calculate Wall Height and Thickness
The first step is figuring out the right proportions for your wall. A common guideline is to make the wall’s base thickness about one-third to one-half of its total height. However, the most important factor is its ability to handle the expected load. A good rule of thumb is to design for a safety factor of 1.5, which means the wall should be built to withstand at least 1.5 times the anticipated pressure from the soil. This extra strength is a critical buffer that helps prevent failure when the ground becomes saturated with water or settles over time. For taller or more complex walls, consulting an engineer is always the safest bet.
Plan for Foundation Depth and Frost Lines
Your wall is only as strong as its foundation. While Florida homeowners don’t have to worry about deep frost lines like in northern climates, the principle of a stable base is just as important for our sandy, shifting soils. You should plan to bury at least 10% of the wall’s total height, plus an additional six inches for the gravel base. For example, a four-foot-tall wall should have about one foot of its structure below ground. A packed gravel base is essential because it creates a level surface and allows water to drain away from the foundation, which is key to enhancing its durability and preventing erosion from underneath.
Account for Soil Pressure and Load
The soil behind your wall exerts a constant, powerful force called lateral earth pressure. This pressure increases significantly on a slope, especially after heavy rainfall. Your design must account for this load. Reinforcement is not an optional step; it’s a core component of a stable wall. For concrete block walls, this often means using geogrid, a mesh-like material laid between courses that extends back into the slope. For poured concrete, steel rebar provides the necessary tensile strength. Properly installed reinforcement helps manage the lateral earth pressure and ties the wall securely to the earth it’s holding back, ensuring it remains stable for years to come.
What Tools and Safety Gear Will You Need?
Before you break ground, let’s talk about getting your toolkit and safety gear in order. Having the right equipment on hand not only makes the job go smoother but also keeps you safe from start to finish. You don’t need a professional-grade workshop, but a few key items are essential for building a wall that’s both beautiful and structurally sound.
Essential Hand and Power Tools
For any retaining wall project, you’ll need a few trusty hand tools. A shovel is for digging the trench where your wall will sit, a rake helps level the soil, a level ensures every layer is perfectly straight, and a tamper packs down the base for a solid foundation. If you’re working with particularly stubborn soil, you might want to use more powerful compacting tools like a gas-powered plate compactor. These tools help you achieve the right soil density, which is critical for a long-lasting wall that won’t shift or settle over time.
When to Rent Heavy Machinery
Wondering if you need to call in the big guns? For larger walls or projects on a significant slope, renting heavy machinery can be a game-changer. An excavator or a skid steer can handle the heavy lifting of digging and moving large amounts of soil, saving you days of back-breaking labor. If your project involves serious earth-moving, don’t hesitate to look into local rental options. It’s an investment in your time and energy that often pays for itself by helping you complete the project efficiently and correctly.
Personal Protective Equipment (PPE)
Let’s not forget the most important part: keeping yourself safe. Construction projects, big or small, come with risks, so it’s smart to be prepared. Always wear your personal protective equipment (PPE). This includes a hard hat to protect your head, safety goggles for your eyes, heavy-duty gloves to save your hands from scrapes, and steel-toed boots to protect your feet from falling materials. Taking these simple precautions is non-negotiable. It’s also a good idea to understand the best retaining wall safety practices before you begin, which includes making sure your design meets all local building codes.
Building Your Retaining Wall: A Step-by-Step Guide
With your design finalized and materials on hand, it’s time to start building. Building a retaining wall on a slope may seem daunting, but with the right approach, you can create a stable, durable structure that prevents soil erosion and transforms your sloped yard into usable, attractive outdoor space. Follow these steps carefully to ensure your wall is strong, level, and built to last.
Step 1: Excavate and Prepare the Site
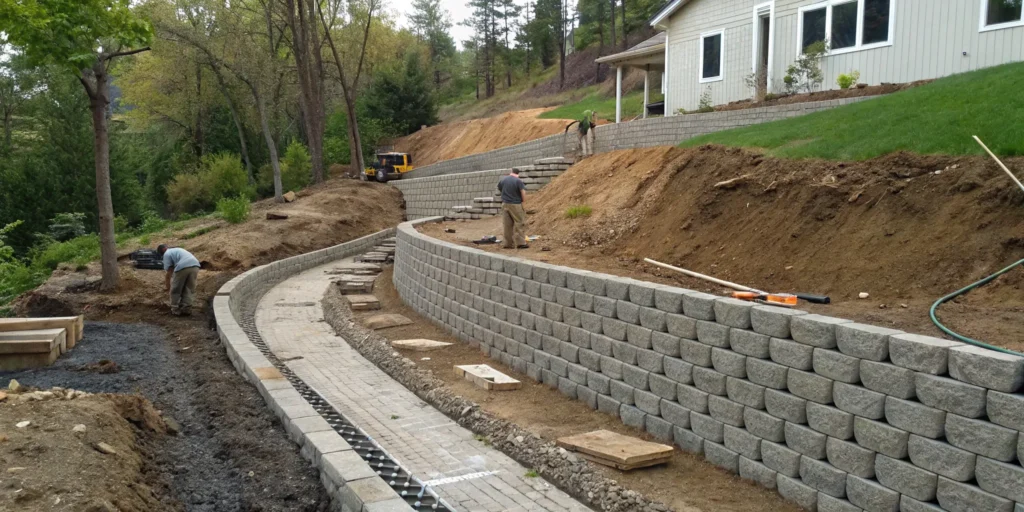
First, you need to create a solid base for your wall. Start by marking the layout of your wall with stakes and string. Then, begin digging a trench along this line. The trench should be wide enough for the blocks plus about 12 inches behind them for backfill. The depth needs to account for your gravel base plus at least half the height of your first course of blocks. For example, if your blocks are 8 inches tall, you’ll want to bury at least 4 inches of the first block. Once you’ve excavated the trench, use a hand tamper to compact the soil at the bottom, creating a firm, level surface to build on.
Step 2: Install and Level the Foundation
Your wall is only as strong as its foundation. The core materials for this step are your retaining wall blocks and a crushed stone or road base for the footing. Pour a layer of your crushed stone base into the trench, aiming for a depth of 4 to 6 inches. Spread it evenly and then use your hand tamper to compact it until it’s firm. Use a long level to ensure the entire base is perfectly flat. This is the most critical step for a professional-looking result. Take your time here, as any imperfections will be magnified as you build the wall higher.
Step 3: Build and Align the Wall
Place the first course of blocks on your prepared gravel base. Use a rubber mallet to tap them into place, checking that each block is level from front to back and side to side. Once the first row is perfect, you can start the second course. Stagger the joints, just like with brickwork, to give the wall greater strength. Most interlocking blocks have a lip on the back that helps create a slight setback with each course. As you add rows, periodically check for level and alignment. When you’re done, you can grade the soil above and behind the wall to slope gently away from the blocks.
Step 4: Add Backfill and Drainage
Proper drainage is essential to prevent water pressure from pushing over your wall. As you build, you’ll add backfill in the space behind the blocks. For the first foot behind the wall, use more of your crushed stone. This allows water to drain freely. To manage this water, put in a special perforated drain pipe behind your first course of blocks, making sure it has a slight slope to direct water away. This lets water flow away and stops pressure from building up. Cover the pipe with more gravel, then lay landscape fabric over the gravel before adding topsoil to prevent dirt from clogging your drainage system.
How to Install an Effective Drainage System
A retaining wall is only as strong as its ability to manage water. Without a proper drainage system, water builds up in the soil behind the wall, creating immense hydrostatic pressure that can cause it to bulge, crack, or even collapse. This is especially true on a slope where water naturally flows downhill. Installing an effective drainage system is not just a suggestion; it’s the most critical step for ensuring your wall lasts for decades. It channels water away safely, protecting your investment and your landscape.
The system itself isn’t complicated. It’s a combination of a perforated pipe, gravel, and filter fabric working together to give water an easy path to escape. Think of it as creating a hidden channel that relieves all the pressure that would otherwise push against your wall. Taking the time to get this part right will save you from costly repairs and the headache of a failing wall down the road. Proper drainage is what separates a temporary fix from a permanent, stable structure that adds value and function to your property. We’ll walk through the three key components: placing the drain pipe, adding the right backfill, and using weep holes for extra security.
Place and Grade the Drain Pipe
The heart of your drainage system is a perforated drain pipe. This pipe collects water at the base of the wall and carries it away. Start by laying a 4-inch perforated pipe behind the first course of your wall, on top of the compacted gravel base. Make sure the pipe’s holes are facing down. This position allows water to enter from below as it saturates the gravel. The most important part is to grade the pipe correctly, creating a gentle downward slope of about 1/8 inch per foot. This ensures water flows out toward a safe discharge point, like a storm drain or a dry well, instead of pooling behind the wall.
Add Gravel Backfill and Filter Fabric
Gravel and filter fabric work together to keep your drain pipe from getting clogged. As you build each course of your wall, add a layer of 3/4-inch crushed stone or gravel behind it, filling the space at least 12 inches deep. This gravel backfill creates a porous zone where water can flow freely down to the drain pipe instead of pressing against your wall blocks. To prevent soil and silt from mixing with the gravel and clogging the pipe, you’ll need a geotextile filter fabric. Wrap the fabric around your perforated pipe before covering it with the first layer of gravel. You should also line the entire back of the gravel zone with fabric, creating a barrier between the gravel and the native soil.
Use Weep Holes to Manage Surface Water
Weep holes are small openings at the base of a retaining wall that act as pressure relief valves, giving trapped water an escape route. While a drain pipe at the base is essential, weep holes provide an extra layer of protection. For segmented block walls, you can create a weep hole by leaving a small, vertical gap between two blocks in the bottom course, making sure not to fill it with mortar or adhesive. You can also simply stagger the first course of blocks slightly. A good rule of thumb is to place a weep hole every 5 to 10 feet along the wall’s length. These openings allow any water that bypasses the main drainage system to seep out, preventing pressure buildup right at the face of the wall.
Common Retaining Wall Mistakes to Avoid
Building a retaining wall is a rewarding project, but a few common missteps can turn your hard work into a costly problem. Getting the construction right from the start saves you from future headaches and ensures your wall stands strong for years. Think of it as protecting your investment of time, money, and effort. By understanding what can go wrong, you can make sure everything goes right. Let’s walk through the most frequent mistakes so you can confidently sidestep them.
Poor Drainage and Water Management
One of the biggest threats to a retaining wall is water. When soil behind the wall gets saturated, it becomes incredibly heavy and exerts immense pressure. This is called hydrostatic pressure, and it can cause your wall to bulge, crack, or even collapse. Without a proper escape route, that water gets trapped and pushes relentlessly against your structure. The solution is to build an effective drainage system. This involves placing a perforated drain pipe at the base of the wall and surrounding it with a generous layer of gravel backfill, which allows water to flow away freely instead of building up.
Weak Foundation or Structural Design
Your retaining wall is only as strong as its foundation. Many DIY failures happen because the base wasn’t properly prepared. A weak or unlevel foundation will cause the entire structure to shift, settle unevenly, and eventually fail. It’s essential to excavate a deep enough trench and fill it with compacted gravel to create a solid, level footing for your first course of blocks. The overall structural design must also be robust enough to handle the forces acting upon it. A good rule of thumb is that the design should be significantly stronger than the load it’s expected to bear.
Incorrect Materials and Safety Oversights
Choosing the right materials is fundamental to your wall’s longevity and safety. Using untreated wood that will rot or blocks that aren’t rated for ground contact can lead to a rapid breakdown of the structure. Every component, from the blocks to the backfill, should be suited for the job. Following the best construction practices for your chosen material is just as important. This means properly staggering the joints between blocks, using the correct adhesive, and ensuring everything is level and plumb as you build. A poorly constructed wall isn’t just an eyesore; it’s a serious safety hazard.
When Should You Hire a Professional?
While tackling a retaining wall project yourself can be incredibly rewarding, some jobs are best left to the experts. Recognizing the limits of a DIY approach is key to ensuring your wall is safe, stable, and built to last. If your project involves complex structural challenges or significant safety risks, calling a professional is the smartest move you can make. It protects your investment, your property, and most importantly, you.
The Slope is Steep or Unstable
Working on a steep or unstable slope is a major red flag. A professional can properly assess the stability of the hillside and determine the safest approach. They understand the risks of landslides and erosion and know how to mitigate them. For instance, a key safety measure is maintaining a safe distance between the wall and the slope’s edge. If the ground feels loose, shifts underfoot, or shows signs of previous slides, it’s crucial to get an expert opinion before you start digging. Their experience is invaluable for creating a secure structure that won’t fail under pressure.
The Wall is Tall or Load-Bearing
The complexity of a retaining wall increases dramatically with its height. A small, decorative garden wall is one thing, but a tall wall holding back a massive amount of soil is an engineering project. If your wall will be over a few feet high or needs to support a driveway, patio, or part of your home’s foundation, it’s considered load-bearing. A professional engineer or landscape architect can ensure the wall is designed to handle the immense pressure and meets all local building codes and regulations. They can calculate the necessary reinforcements and foundation depth to prevent a dangerous collapse.
You Need Help with Permits and Codes
Navigating local building codes and the permitting process can be a headache. Many municipalities have specific rules for retaining walls, especially concerning height, materials, and drainage. Professionals are well-versed in these requirements and can handle the paperwork for you. Hiring an expert ensures your project is fully compliant from the start, saving you from potential fines or the need to tear down and rebuild your work. Their knowledge of soil mechanics and local regulations provides a reliable defense against erosion and contributes to the overall safety and usability of sloped landscapes.
Florida’s #1 Rated Roofing Contractor
Ready for a Roof That Lasts 50 Years?
Get a 100% free, no-obligation roof inspection from South Florida’s only TAMKO Diamond Contractor. No pressure. No hidden fees. Just honest answers.
⭐ 4.8 Google Rating · 600+ Roofs Completed · A+ BBB Rated · Licensed & Insured
Frequently Asked Questions
How high can I build a retaining wall before I need a permit? This is a great question, and the answer often depends on your specific location. As a general rule, many local codes in areas like Palm Beach and Martin counties require a permit and an engineer’s design for any wall taller than four feet. This isn’t just red tape; it’s a safety measure. Taller walls hold back an incredible amount of weight, and a professional design ensures the structure can handle that pressure without risk. Always call your local building department before you start to get the exact requirements for your project.
What is the single most common reason a retaining wall fails? Hands down, the number one cause of retaining wall failure is poor drainage. When water gets trapped in the soil behind a wall, it creates immense hydrostatic pressure. Think of it as the soil becoming a heavy, waterlogged sponge pushing with all its might. Without a clear path for that water to escape, it will eventually cause the wall to lean, crack, or completely give way. A properly installed drainage system with gravel and a perforated pipe isn’t an optional upgrade; it’s the most critical part of the entire build.
How long can I expect my new retaining wall to last? The lifespan of your wall really comes down to two things: the materials you choose and how well it’s built. A timber wall might give you 15 to 20 years, but it will eventually need replacing, especially in our humid Florida climate. A wall constructed from high-quality interlocking concrete blocks or natural stone, however, can last for 50 years or even longer. The key is proper installation, especially a solid foundation and excellent drainage, which protects the structure from the forces that cause it to break down over time.
Do I need to glue the concrete blocks together? For most modern interlocking block systems, you won’t use traditional mortar, but a construction adhesive is highly recommended, especially for the top few courses or capstones. These systems are engineered with lips and grooves that help lock them together, but a strong, flexible adhesive provides extra security against shifting. It helps unify the wall into a single, solid structure. Always check the manufacturer’s instructions for your specific blocks to see what they recommend for the best results.
Can I build a curved retaining wall instead of a straight one? Yes, you absolutely can, and curved walls can be both beautiful and incredibly strong. The gentle arc of a curved wall can actually help it resist soil pressure more effectively than a straight wall. Many interlocking block systems are designed with a trapezoid shape that makes building smooth curves fairly simple. Just remember that the planning phase is even more important here. You’ll want to lay out your curve carefully with a hose or marking paint to ensure the shape is exactly what you want before you start digging.
