If you love grilling but are tired of running back and forth to the house for supplies, an outdoor kitchen is the solution you’ve been dreaming of. It brings all the convenience of your indoor kitchen outside, creating an efficient and enjoyable cooking experience. No more juggling platters, searching for tongs, or leaving your guests to grab something from the fridge. A thoughtfully designed space puts everything you need right at your fingertips. Learning how to build an outdoor kitchen is the first step toward creating that seamless workflow. This guide will show you how to plan a functional layout and select the right features for your needs.
Florida’s #1 Rated Roofing Contractor
Ready for a Roof That Lasts 50 Years?
Get a 100% free, no-obligation roof inspection from South Florida’s only TAMKO Diamond Contractor. No pressure. No hidden fees. Just honest answers.
⭐ 4.8 Google Rating · 600+ Roofs Completed · A+ BBB Rated · Licensed & Insured
Key Takeaways
- Create a solid blueprint before you build: A successful outdoor kitchen starts with thoughtful planning. Define your layout with functional zones for cooking and entertaining, establish a realistic budget, and check local building codes before you lay the first stone.
- Invest in climate-appropriate materials: To ensure your kitchen lasts, choose materials specifically designed to handle Florida’s sun and humidity. Opt for durable options like steel framing, granite countertops, and weatherproof cabinetry to prevent rust, rot, and fading.
- Think beyond the grill to create a complete space: Elevate your kitchen’s functionality with essential features like ample counter space, smart storage, and proper lighting for safety. Consider adding a roof to protect your investment and create a comfortable outdoor room you can enjoy in any weather.
How to Plan Your DIY Outdoor Kitchen
A great outdoor kitchen starts long before you lay the first stone. Solid planning is the foundation of your entire project, saving you from costly mistakes and headaches down the road. Think of this phase as creating the blueprint for your dream outdoor space. By taking the time to define your vision, understand the rules, and select your core components, you set yourself up for a smooth and successful build. Let’s walk through the first crucial steps to get your project off the ground.
Define Your Vision, Budget, and Location
Before you do anything else, take some time to dream. How do you see yourself using this new space? Will it be a simple grilling station for weeknight family dinners or a full-service entertainment hub for hosting parties? Your lifestyle, climate, and budget will guide your outdoor kitchen designs. Make a list of must-have features and a separate list of nice-to-haves. Next, establish a realistic budget that covers materials, appliances, and potential permit fees. Finally, scout the perfect location in your yard, considering its proximity to the house, access to utility lines, and how it will flow with your existing landscape.
Check Local Building Codes and Permits
This step isn’t the most exciting, but it’s one you absolutely can’t skip. Most outdoor kitchen projects, especially those involving plumbing, gas, or electrical work, require permits. Local building codes dictate everything from how far your grill must be from existing structures to the types of materials you can use. Contact your local municipality in Palm Beach or Broward County to understand the specific requirements for your area. According to This Old House, permits for outdoor projects can add a few hundred to a couple of thousand dollars to your cost, so be sure to factor this into your budget from the start.
Choose Your Essential Components
With a vision and budget in place, you can start selecting the key pieces of your outdoor kitchen. The most essential parts of an outdoor kitchen typically include a grill, countertops for food prep, a sink for cleanup, and some form of storage for tools and supplies. Think about how you cook and entertain to determine what’s most important for your setup. You can also use different materials to visually define functional zones, like having a stainless steel countertop for your cooking station and a granite bar top for your seating area. Prioritizing these core components helps ensure your kitchen is functional and fits your budget.
How Do I Design the Best Outdoor Kitchen Layout?
A great outdoor kitchen is more than just a grill and a countertop. The secret to a space you’ll love for years is a thoughtful layout. Planning how you’ll cook, entertain, and move around the space is the key to creating a functional and beautiful extension of your home. A smart design considers everything from where you’ll chop veggies to how guests will grab a cold drink. Let’s walk through how to create a layout that works for you.
Create Functional Zones for Cooking and Entertaining
Think of your outdoor kitchen like your indoor one, with distinct areas for different tasks. Creating functional zones helps keep everything organized and within reach. You’ll want a hot zone for your grill and any side burners, a cold zone for the refrigerator, a wet zone with a sink for prep and cleanup, and a dry zone for plating and serving. A great way to visually define these areas is by using different materials. For instance, you could use a durable stainless steel countertop in the hot zone and a beautiful granite for the bar and serving area where guests will gather.
Optimize Your Kitchen’s Workflow
A good layout makes cooking outside feel effortless. The goal is to create an efficient workflow so you aren’t running back and forth. Many designers apply the classic “kitchen triangle” concept, placing the grill, sink, and refrigerator in an easy-to-move-between triangle. Think about your personal cooking style. Do you need a lot of prep space right next to the grill? Where will you set down a tray of finished food? An ergonomic design ensures your cooking area is safe, comfortable, and supports everything from daily family meals to frequent entertaining, making the whole experience more enjoyable.
Plan for Utilities: Gas, Water, and Electric
This is the behind-the-scenes work that makes your kitchen truly functional, so it’s essential to plan it from the start. You’ll need to decide how to run lines for gas, water, and electricity. For your grill, will you connect to a natural gas line for convenience or use a portable propane tank? For the sink, you’ll need both a water supply and a drainage line. And don’t forget electricity for refrigerators, blenders, and especially lighting. Proper planning ensures your layout matches your lifestyle and budget. Because this involves plumbing and electrical work, it’s always best to consult with licensed professionals to ensure everything is installed safely and up to code.
What Materials Should I Use for My Outdoor Kitchen?
Choosing the right materials is one of the most important steps in building an outdoor kitchen that will last for years. Here in Florida, your kitchen will face a unique combination of intense sun, heavy rain, and high humidity, so durability isn’t just a bonus, it’s a necessity. The goal is to select materials that not only look great but can also stand up to the elements with minimal upkeep. Think of it as building a small-scale house in your backyard; the structure needs a solid frame, resilient surfaces, and protective finishes to endure.
Making the right choices from the start will save you from costly repairs and constant maintenance down the road. You want to spend your time enjoying your new space, not refinishing wood or replacing warped cabinet doors. We’ll walk through the best options for your kitchen’s framing, countertops, and cabinets. This will help you make an informed decision that fits your personal style, your budget, and the demands of our local climate. A well-built kitchen using the right materials will become a lasting and valuable addition to your home.
Durable Framing: Steel vs. Concrete vs. Wood
The frame is your kitchen’s skeleton, so it needs to be incredibly strong and weather-resistant. Steel and concrete are the top contenders for outdoor kitchen construction in Florida. Galvanized steel framing is lightweight, non-combustible, and won’t rot or warp in the humidity. Concrete masonry units (CMUs), or concrete blocks, offer a rock-solid, stable base that provides excellent durability. While wood has a classic, natural appeal, it requires diligent maintenance in our climate to fend off rot and pests. If your heart is set on wood, be sure to use pressure-treated lumber and apply a high-quality sealant regularly.
Weatherproof Countertops: Granite, Concrete, and Steel
Your countertops are the workhorses of your outdoor kitchen, so they need to handle hot pans, food prep, and sudden downpours without staining or cracking. Granite is a fantastic all-around choice, celebrated for its toughness and natural resistance to heat and bacteria. Concrete countertops can be poured and customized to any shape, offering a sleek, modern aesthetic and incredible durability. Another great option is stainless steel, which is hygienic and easy to clean. Just keep in mind that it can get quite hot in direct sunlight, so it’s often best for covered outdoor kitchens.
Low-Maintenance Finishes: Cabinets and Siding
The finishes, like your cabinets and siding, are what bring your kitchen’s style to life while protecting its inner workings. For cabinets, look for materials specifically designed for the outdoors, such as marine-grade polymers (HDPE) or stainless steel, which won’t warp, fade, or rust. For the siding or base of your kitchen island, you can use materials that tie into your home’s exterior for a seamless look. A stone or brick veneer can create a beautiful, integrated design that complements a home with traditional shingle roofing. This approach ensures your new outdoor space feels like a natural and intentional extension of your home.
Building Your Outdoor Kitchen: A Step-by-Step Guide
With your design plans finalized, it’s time to bring your outdoor kitchen to life. Building the structure is a multi-step process that requires careful attention to detail, from the foundation to the final finishes. Following these steps will help you create a durable and beautiful space for cooking and entertaining. Remember to always prioritize safety, especially when working with framing and utilities. Let’s get building.
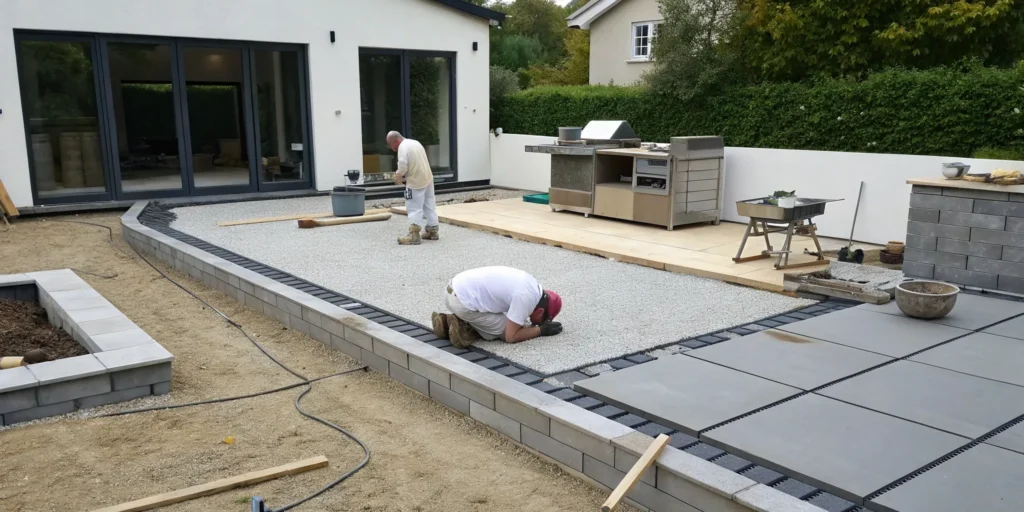
Step 1: Prepare the Foundation and Base
Every great structure starts with a solid foundation, and your outdoor kitchen is no exception. You need a perfectly level and stable surface to build on. A reinforced concrete slab is an excellent choice for its durability, but a well-built paver patio can also work beautifully. If you’re building on an existing deck, make sure it can handle the significant weight of the kitchen island and appliances. Before you pour concrete or lay pavers, you’ll need to properly prepare the ground by clearing, leveling, and compacting the area. This initial step is critical for preventing cracks and shifting down the road, ensuring your kitchen stands strong for years of cookouts.
Step 2: Construct the Frame and Install Backer Board
Next, you’ll build the skeleton of your kitchen island and cabinets. While pressure-treated wood is an option, steel studs are often a better choice, especially in Florida’s humid climate, because they are resistant to moisture, rot, and pests. Assemble the frame according to your design, creating openings for your grill, refrigerator, and storage doors. Once the frame is secure, you’ll cover it with cement backer board. This material creates a fire-resistant, water-resistant, and stable surface to which you can apply your final finishes, like stone veneer or stucco. It’s an essential layer of protection for the entire structure.
Step 3: Run Utility Lines for Plumbing and Electrical
This is the stage where it’s wise to call in the professionals. Unless you are a licensed electrician or plumber, you should hire one to run the necessary lines for your sink, lighting, outlets, and gas appliances. They will ensure everything is installed safely and up to local code. All wiring and outlets must be rated for outdoor use, and any electrical outlets should have GFCI protection to prevent electric shock in wet conditions. Planning the utility runs carefully ensures your kitchen is not only functional but also completely safe for you and your family to enjoy.
Step 4: Install Countertops and Finishing Materials
Now for the fun part: making your kitchen look great. First, install your countertops. Materials like granite, concrete, and quartzite are fantastic outdoor countertop options because they can withstand sun, rain, and heat. Your supplier will cut the stone to your specifications, including openings for the sink and grill. After the countertops are in place, you can apply the finishing material to the base of the island. Stone or brick veneer, tile, and stucco are all popular choices that add texture and personality. This step truly defines the style of your outdoor kitchen, tying it into the overall look of your backyard.
Step 5: Set Up Appliances and Final Details
The final construction step is installing your appliances and finishing touches. Carefully slide your grill, outdoor refrigerator, and any other components into their designated spaces. Once they are in place, a professional can make the final connections to the gas, water, and electrical lines. With the main appliances installed, you can add the cabinet doors, drawers, and hardware. Double-check that everything is level, secure, and operating correctly. Proper ventilation for your grill is especially important, so ensure there is adequate airflow around the unit as specified by the manufacturer. Now, all that’s left is to plan your first meal.
What Features Make an Outdoor Kitchen More Functional?
A great outdoor kitchen is more than just a pretty space; it needs to work for you. Functionality comes from thoughtful planning around how you’ll actually cook and entertain. It’s about creating an efficient, comfortable, and safe environment that makes outdoor cooking a joy, not a chore. By focusing on a few key features, you can design a space that feels just as practical as your indoor kitchen, but with much better views. These elements turn a simple grill station into a high-performance culinary hub for daily meals and frequent entertaining.
Select Must-Have Appliances
The grill is the heart of your outdoor kitchen, but the right supporting appliances are what make it truly functional. Think about how you cook indoors and what you’d miss most. A side burner is perfect for simmering sauces or boiling corn, while an outdoor-rated refrigerator keeps drinks, marinades, and ingredients chilled and within reach. A dedicated sink is a game-changer for prep and cleanup. High-performance outdoor kitchen designs are built around creating efficient cooking areas, so choose appliances that streamline your process. Always opt for durable, weather-resistant materials like stainless steel to ensure your investment can handle Florida’s sun and humidity.
Ensure Ample Counter Space and Storage
You can never have too much counter space. You’ll need dedicated areas for prepping food, placing hot pans, and serving guests. Plan for at least 12 inches of “landing space” on either side of your grill and sink. To keep things organized, you can even differentiate workstations by using different countertop materials to visually separate your prep zone from your serving bar. Don’t forget storage. Weatherproof cabinets and drawers are essential for protecting your grilling tools, dishes, and cleaning supplies from the elements. Having everything you need organized and close by means less running back and forth to the house.
Install Proper Lighting for Safety and Ambiance
Good lighting serves two critical purposes: it keeps you safe while cooking and creates a welcoming atmosphere for your guests. Start with task lighting directly over your primary work areas, like the grill, sink, and countertops. Under-cabinet LED strips or focused spotlights work well for this. Next, add ambient lighting to set the mood. Wall sconces, string lights, or integrated landscape lighting can cast a warm, inviting glow over your seating and dining areas. When selecting fixtures, choose materials that can withstand the outdoors. Stainless steel is a popular choice because it holds up well in any climate, ensuring your lighting is both beautiful and built to last.
Should You Add a Roof to Your Outdoor Kitchen?
An outdoor kitchen is a fantastic investment, but in Florida, the weather can be unpredictable. One minute it’s sunny, and the next, a downpour sends everyone running inside. Adding a roof over your outdoor kitchen isn’t just a luxury; it’s a practical step that protects your setup and makes the space usable year-round. A well-designed roof turns your patio into a true outdoor living room, shielding you and your guests from intense sun and sudden rain showers. It ensures your cookouts are never canceled due to weather, allowing you to get the most out of your beautiful new space.
The Benefits of Overhead Protection
Think of a roof as the ultimate insurance policy for your outdoor kitchen. It provides a powerful shield against the elements, protecting your expensive appliances, countertops, and cabinetry from harsh UV rays and damaging moisture. This simple addition can significantly extend the life of your investment. Beyond protection, a roof enhances comfort by creating a cool, shaded area for cooking and dining. It also helps manage cooking smoke, preventing it from lingering and ensuring a more pleasant atmosphere for you and your guests. With a roof, your outdoor kitchen becomes a reliable, all-weather extension of your home.
Popular Roofing Options
You have several great options when it comes to covering your outdoor kitchen. Pergolas and gazebos are popular for creating a defined space with partial shade. For complete protection, however, a solid roof is the way to go. You can build a permanent structure that connects to your home, creating a seamless transition. The best part is you can match it to your home’s existing roof. A classic shingle roofing system offers a traditional look, while a modern metal roofing installation provides incredible durability and a sleek finish. For a touch of Mediterranean elegance, beautiful tile roofing can make your outdoor kitchen a true showpiece.
How to Match Your Home’s Style
To make your outdoor kitchen feel like a natural part of your property, it’s important to create a cohesive look. The roof you choose should complement your home’s existing architecture and color scheme. Take a look at your house: what materials and colors do you see? If your home has a tile roof, extending that same style to your outdoor kitchen cover creates a harmonious design. The goal is for the new structure to look like it was always there. By selecting materials and a design that ties into your home’s aesthetic, you create a polished and intentional outdoor living space.
How to Integrate Your Kitchen with the Landscape
An outdoor kitchen should feel like a natural part of your backyard, not something that was just dropped into place. The goal is to create a space that flows beautifully from your home into your garden, making your entire property feel more connected and inviting. A thoughtful design considers the existing environment and uses it to its advantage, creating a destination that’s both functional for cooking and relaxing for entertaining. When you successfully integrate your kitchen with the landscape, you’re not just adding an appliance station; you’re crafting a cohesive outdoor living area. This means thinking beyond the grill and countertops to consider how the entire space interacts with your home’s architecture and your yard’s natural features.
By carefully selecting materials that echo your home’s exterior, using plants strategically for privacy and definition, and blurring the line between inside and out, you can build an outdoor kitchen that looks like it was always meant to be there. This approach not only improves the look of your space but also makes it more functional and enjoyable. Think of it as creating an outdoor living room where the kitchen is the star, supported by the natural beauty of your landscape. It’s about making the transition from your back door to your grill feel effortless and intentional, encouraging more time spent enjoying the fresh air with family and friends. A well-integrated kitchen becomes the heart of your backyard.
Choose Cohesive Materials for a Natural Flow
To make your outdoor kitchen feel like a true extension of your home, start by looking at the materials you already have. Does your house have brick accents? Is your patio made of flagstone? Repeating these materials in your kitchen’s design creates a powerful sense of continuity. For example, you could use the same stone for your kitchen’s base as you have on your home’s facade or choose a paver that complements your existing pool deck.
Your choices should also be guided by your environment and lifestyle. Select durable, weather-resistant materials that can handle Florida’s sun and humidity. Stainless steel appliances are a classic for a reason, but also consider countertops made of granite or concrete and flooring like porcelain tile or natural stone. The right materials will not only look great but will also ensure your kitchen stands up to the elements for years of cookouts.
Use Landscaping to Add Privacy
Your backyard should be your private retreat, and landscaping is the perfect tool to make it happen. Instead of building tall fences that can feel restrictive, use plants to create a soft, natural screen around your outdoor kitchen. Tall hedges, clumping bamboo, or a trellis covered in flowering vines can shield your space from neighbors while adding color and texture. This approach makes the area feel more intimate and secluded.
You can also use landscaping to define different functional zones. A row of potted herbs can create a subtle border between your cooking station and your dining area, keeping them separate but connected. Planter boxes filled with ornamental grasses or tropical plants can frame your seating area, making it feel like a distinct “room” within your larger backyard. This use of greenery adds beauty and helps organize your outdoor living space.
Create a Seamless Indoor-Outdoor Connection
The best outdoor kitchens make it easy to move between your house and your yard. To create this seamless flow, think about how the two spaces connect. Installing large sliding glass doors or a folding glass wall can physically and visually open up your home to the patio. Another popular option is a pass-through window from your indoor kitchen to the outdoor bar, which is perfect for handing out drinks and food.
Carry your indoor style outside to strengthen the connection. If your home has a modern, minimalist design, continue that look with clean lines and neutral colors in your outdoor kitchen. Use similar flooring materials for the room leading outside and the patio itself to erase the boundary between them. This thoughtful coordination makes your outdoor kitchen feel less like an addition and more like an integral part of your home’s overall design.
What Common Mistakes Should I Avoid?
Building an outdoor kitchen is an exciting project, but a few common missteps can turn your dream space into a frustrating one. Thinking through the details ahead of time helps you create a kitchen that’s not only beautiful but also functional and safe for years of enjoyment. Let’s walk through some of the most frequent mistakes so you can sidestep them with confidence and get the most out of your investment.
Don’t Skimp on Space Planning
One of the biggest regrets homeowners have is not planning for enough space. It’s easy to focus on the grill and countertops, but you also need room for people to move around comfortably. A cramped layout can make cooking and hosting feel chaotic. As a rule of thumb, aim for at least three feet of walking space between the different parts of your kitchen and patio furniture. This ensures a smooth flow for you and your guests. Before you build, use tape or spray paint to map out your layout on the ground to get a real feel for the dimensions.
Don’t Choose Materials Unfit for Your Climate
Here in Florida, our outdoor spaces face intense sun, high humidity, and heavy rain. Choosing materials that can’t handle these conditions will lead to rust, rot, and fading. For appliances and cabinets, stainless steel is a popular choice because it’s durable and easy to clean. For countertops, look into non-porous options like granite or sealed concrete that resist stains and mildew. Investing in weatherproof materials from the start will save you from costly repairs and replacements down the road, ensuring your kitchen stays beautiful through every season.
Don’t Overlook Utilities and Safety Features
The excitement of picking out a new grill can sometimes overshadow the less glamorous, but critical, planning for utilities. Running gas, water, and electrical lines is not a DIY-friendly task. For safety and to ensure everything is up to code, it’s best to hire licensed professionals to handle these installations. Proper ventilation is another key safety feature, especially if your kitchen is under a covered patio. You also need to plan for adequate task lighting for safe cooking after dark and ambient lighting to create a welcoming atmosphere for your guests. Getting these foundational elements right is essential for a safe and functional outdoor kitchen.
How to Maintain Your Outdoor Kitchen
Once your beautiful outdoor kitchen is built, the next step is keeping it in top shape. Think of it like any other major home investment; a little regular care goes a long way, especially here in Florida where the sun, humidity, and rain can be relentless. Consistent maintenance not only keeps your space looking fantastic for every cookout but also protects your appliances and materials from premature wear and tear. By creating a simple routine, you can prevent small issues from turning into costly repairs and ensure your outdoor oasis remains a favorite gathering spot for years to come.
Protecting your outdoor kitchen is about more than just cleaning. It involves shielding your investment from the elements, performing seasonal checks, and knowing how to prepare for stormy weather. Just as your home’s roof protects everything underneath it, a good maintenance plan will safeguard your grill, countertops, and cabinets. This proactive approach ensures everything works correctly and safely, so you can focus on what matters: grilling up delicious food and making memories with family and friends. Let’s walk through the simple habits that will keep your outdoor kitchen functional and beautiful.
Your Daily and Weekly Cleaning Routine
The easiest way to handle maintenance is to make it a habit. A consistent cleaning routine will keep your outdoor kitchen looking good and lasting a long time. After each use, wipe down countertops and clean the grill grates while they’re still warm, as this makes it much easier to remove grease and food bits. Once a week, give the space a more thorough sweep, wipe down cabinet fronts, and check for any pests. This small, regular effort prevents grime from building up and makes deep cleaning much less of a chore. It’s a simple way to ensure your kitchen is always ready for an impromptu barbecue.
Protect Appliances and Materials from Weather
Florida’s weather can be tough on outdoor equipment. To protect your investment, cover your grill and other appliances when you’re not using them. These covers are your first line of defense against rain and harsh UV rays that can damage electronics and fade finishes. For surfaces, periodically treat wood and seal stone to protect them from moisture and sun damage. Storing smaller items like cushions and cooking utensils indoors during bad weather will also extend their lifespan. Taking these simple protective measures ensures your kitchen components withstand the elements and continue to look and function like new.
Follow Seasonal Maintenance and Winterization Tips
Even in sunny Florida, seasonal upkeep is key. Before the rainy season, do a deep clean of your entire kitchen. Check gas lines for leaks and ensure all electrical components are secure and protected from moisture. It’s also a good time to inspect any paint or sealant on your kitchen’s structure and touch it up as needed. If a hurricane is approaching, take time to secure everything. Store all removable items indoors, shut off gas and water lines, and make sure appliance covers are fastened tightly. Proper hurricane preparedness can save you from significant damage and ensure your kitchen is ready to use once the storm passes.
Florida’s #1 Rated Roofing Contractor
Ready for a Roof That Lasts 50 Years?
Get a 100% free, no-obligation roof inspection from South Florida’s only TAMKO Diamond Contractor. No pressure. No hidden fees. Just honest answers.
⭐ 4.8 Google Rating · 600+ Roofs Completed · A+ BBB Rated · Licensed & Insured
Frequently Asked Questions
How much should I budget for an outdoor kitchen? The cost can vary widely depending on the size, materials, and appliances you choose. A simple grilling island might cost a few thousand dollars, while a full-service kitchen with high-end appliances, a sink, and extensive countertops can run much higher. The best approach is to decide on your must-have features first, get quotes for materials and any professional labor you’ll need (like for plumbing or electrical), and then build a realistic budget from there.
What’s the most critical part of the planning process I shouldn’t overlook? Definitely the behind-the-scenes stuff: utilities and permits. It’s easy to get excited about grills and countertops, but figuring out how you’ll run gas, water, and electrical lines from the very beginning is essential. Contacting your local municipality early to understand building codes and permit requirements will save you from major headaches and costly changes later on.
Can I build the entire outdoor kitchen myself? While you can certainly handle many parts of the construction, like building the frame and applying finishes, some jobs are best left to licensed professionals. For your safety and to ensure everything is up to code, you should always hire a qualified plumber and electrician to install your utility lines. This ensures everything is done correctly and protects your home and family.
What are the best materials for a kitchen that will last in Florida’s climate? In Florida, durability is key. For the kitchen’s frame, steel studs or concrete blocks are excellent choices because they won’t rot or warp in the humidity. For countertops, granite and sealed concrete are fantastic because they resist heat, moisture, and stains. When it comes to cabinets and appliances, always choose options specifically rated for outdoor use, like those made from stainless steel or marine-grade polymers.
How can I make my outdoor kitchen feel like a natural part of my home? Creating a cohesive look is all about connection. Try to repeat materials from your home’s exterior, like matching a stone veneer on the kitchen island to accents on your house. You can also use landscaping to soften the edges and create a seamless transition between the structure and your yard. Thinking about the flow from your back door to the patio helps make the kitchen feel like an intentional and beautifully integrated part of your living space.
